Cleaning…

Most of the parts that have been sand blasted so far.
As I suggested in my last post, I’ve been spending a lot of time at the sand blasting cabinet for the last few months. I was using a high quality, but inexpensive silica sand (with a respirator) at first, but decided that aluminum oxide would be better and safer to use in this application. It has proved to be much more efficient as removing paint and rust from these heavy welded and cast parts. The only problem is that just when you think you’re almost done, you find more parts to clean. I think I may be working on this task for another several months alone. I recently acquired a 5 lb tumbler from Eastwood, so while I’m doing this I’ve got the tumbler running in the background cleaning hardware too. It’s like I’m doing two jobs at once!

New paint rack with some parts hanging on it.
Soon, I’ll need to start applying paint to these parts and I needed to figure out how to hang them so I could do that. I found a deal on a rolling paint rack on Amazon that I just couldn’t pass up. It comes with six hangars for parts, and I figure I can make more out of wire for smaller or additional parts to hang at another level. This will serve as my practice for applying paint with a spray gun – yet another thing I’ve never done before, but always wanted to learn how to do. Most of these parts will be painted with POR-15 Rust Preventative followed by a black POR-15 Top Coat. According the the instructions, the company says that the top coat should be applied when the rust preventative is still tacky, so I surmise that I will need to limit the number of items I paint so I can clean the gun and load it with the top coat before I’ve passed the right drying point on the painted parts. This should be interesting…
About Those Skateboards
So, you ask “What do skateboards have to do with a Jeep restoration project?” Well, nothing really, but since my right hand man has been sent overseas for several months, I have been forced to move heavy things around the shop by myself. This has required me to become a bit creative at times. One of these heaving items is the ’85 frame. It will need to get out of the shop for sand blasting and I can’t get our tractor all the way into the shop to lift it because the Roll-Over Protection System (ROPS, a fancy name for the roll bar) is too tall for the shop door. It occurred to me that if I could put wheels under the legs of the horses the frame is sitting on, I could roll it to the door and then lift it from there.
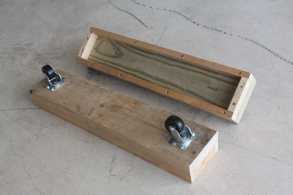
The completed “skateboards”.
The result is shown in the picture at right and looks something like a skateboard – a deadly one at that. They’re made out of scrap 2 x 6, some 1″ boards I ripped down to 1 1/4″ wide and 2″ heavy duty swivel casters at each end. They’re sized to just fit the spread of the legs on the horses and I found that I had to pin them through the sides into the base of the legs of the horses. Before I did this, they wanted to twist out from under the horse when weight was applied to them.

One of the horses with the “skateboards” installed.
Here they are installed on a Harbor Freight “heavy duty” horse that has had its top plate replaced with a piece of 2 x 6. One might ask how I spirited the horse out from under the frame to get these little guys installed. Well, it occurred to me that I could use the engine hoist with the load leveler acting as a kind of spreader bar to lift and hold the frame while I worked on a horse. As I mentioned above I tried the front one without pins first and quickly discovered my design had a flaw so I corrected that and set the front back down.

Front of the ’85 frame sitting on the completed horse. Engine lift is in the background freeing the rear horse for installation.
As shown in the picture at right, the back one was a little more tricky because access to the back of the frame was more cramped. I had to approach the frame from the side and at an angle with the boom fully extended to reach where I needed to lift the back. At the same time I had to keep the legs of the hoist from getting in the way of the horse with its new shoes. It all turned out well in the end; I made a test “drive” to the shop door and back – it worked better than I expected. I found that I just need to be careful with the rather flimsy horses as they sometimes twist under the weight if the wheels get caught on something on the floor.
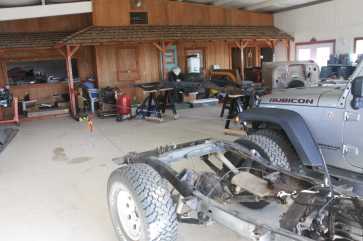
The Bath
The weather has been so good in the waning months of this year that I decided it was time to take the ’84 chassis out of the shop and hose the remaining mud off that was left from the roll-over. It was a low priority task that I just never got around to doing before.
The first job was to make sure the pressure washer that I inherited from my father-in-law still ran. I hadn’t started it in more than 5 years and had left gas in the tank that now smelled more like paint thinner than gas. I drained it and let it air out a bit and then ran a little fresh gas through it to rinse it out. I reinstalled the supply hose, gave it some choke and about three pulls and off it went – you’ve really got to hand it to the guys at Honda, they really seem to make a good product.
Next, I went around the chassis sealing all the important openings to keep the water out – brake lines, fuel lines, air intake, PCV valve hose, etc. After that was done, I kicked the blocks out and pushed it out the roll-up door. It rolled down the slight slope from the door and just sat there. I was going to have to move it about 300 feet to get to water and the prospect of pushing it that far didn’t appeal to me, so I hooked up the Wrangler with a chain, put it in 4-low for the gearing and towed it to it’s destination…with several stops since the steering had a mind of its own.

The ’84 chassis after it’s pressure washer bath.
The pressure washer proved an invaluable tool in getting all that crusty mud and a fair amount of grease and grit off the running gear. There was mud in places I wouldn’t have imagined you could get it. An interesting thing is that one of the wheels has grass rolled under the bead of the tire such that it won’t come out, but none of the tires went flat during the accident. We’re going to have to have this one broken down, cleaned and reseated when we put everything back together. After it was washed, I let it sit out for a while to air dry.
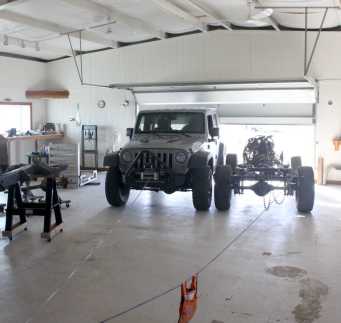
the ’84 chassis returns to the shop after its bath. This is the first time I’ve used the winch on the Wrangler.
The next job was to get it back into the shop. I towed it back with the Wrangler – towing it backward was even more challenging than towing it forward as the steering really didn’t want to cooperate. Once I got it to the shop, I blocked the tires, unhooked the Wrangler and positioned it on the south side of the shop door so I could use the winch to pull the chassis (up the slight slope) into the shop . As you can see from the photos, there are some posts in the back third of the shop that I was able to rig a snatch block from. Having 90 feet of cable on the winch paid off in this situation as the total distance to the post and back to the chassis was about 80 feet. Having a wireless controller was a blessing too as I could move around and observe the progress while the chassis was coming in.
Another view of the ’84 chassis entering the shop. It was a tight squeeze next to the Wrangler.
It was a slow pull with many adjustments to the front wheels of the chassis so I could squeeze through the door next to the Wrangler and up over the lip of the shop floor. Once I got the front wheels on the floor, I was able to disconnect the winch. I moved the Wrangler out of the way and pushed the chassis back into its resting place. From here it will provide an assembly reference and a couple of parts for the ’85 build. By the way, in this last picture, you can see the fruit of my labor in the fact that the frame for the ’84 has been moved out of the way for this job on those handy dandy “skateboards”. After all was done I effortlessly put it back where it belonged.
In the coming weeks I hope to get the ’84 frame out for sand blasting, I’ll talk about new gearing for the axles and we’ll see how the POR-15 works out. As always, write if the mood strikes…
